
Introduction
In today’s modern applications and complex systems, it’s quite common to encounter scenarios where multiple processes simultaneously attempt to access some shared resource, which can be anything from a file, an API endpoint, an in-memory data structure, or others.
And as the demand for distributed systems and microservices architecture grows, so does the need to efficiently manage access to these resources. However, managing access to shared resources in a distributed system is challenging. With multiple processes contending for access, issues like deadlocks and resource starvation may cause serious trouble, potentially leading to system failure and corrupt or inconsistent data.
In this blog post, we’ll dive into distributed locks, specifically in .Net, and see how to use them in real-life situations. By the end, I hope you will have a clear picture of what are distributed locks, what problems they are trying to solve, and how you can implement them with Redis or ZooKeeper.
Why do we need distributed locks?
It is important to understand the fundamental reasons why we need to implement locks and locking mechanisms. At the core, a distributed lock serves a singular, crucial, and pivotal purpose: To ensure that among several nodes, processes, or threads competing and demanding access to some shared resource, only one successfully gets access to it, at least at any given moment.
Let’s consider a scenario where multiple nodes within a distributed system (like a microservices-based environment), are trying to get execute some shared piece of work. This work could be anything from trying to write data to a file in a centralized storage system, saving some records in a database, performing some complex computation, or even making an API call. This is where locks come in handy and to the rescue!
So the question here is: Why do we need to lock in the first place? what are they protecting the system from?
At a high level, we can say that locks help improve system efficiency, ensure correctness, and add more stability (less chances for crashes in some cases). Let’s briefly discuss these claims:
- Improve Efficiency When speaking of efficiency, a lock becomes a very good practice for preventing redundant work. When a node acquires a lock on a resource, it is essentially reserving the task at hand for itself, thus preventing others from doing the same task and the same effort. This becomes very beneficial in scenarios with heavy computational effort. Let’s take a simple example for calculating the factorial of 20:
- Without Lock: Three nodes simultaneously receive a request to calculate the factorial of 20 (20!). Without coordination, each node performs the calculation independently. This means that they all perform the same work, involving numerous multiplications. This redundancy wastes computational resources and time.
- With Lock: A distributed lock ensures that only one node calculates the factorial of 10, while the others wait for the result to become available. This way, the expensive computation occurs only once, significantly improving computational efficiency.
- Ensure Correctness Distributed locks also play a crucial role in keeping our systems running smoothly, without processes interfering with each other and stepping on each other toes. When a lock that is meant to ensure accuracy fails, it can result in corrupted data or incorrect system state. Let’s see a simple example of updating product inventory.
- Without Lock: Two nodes concurrently receive orders for the last available unit of a product. Both nodes attempt to update the quantity simultaneously. This lack of coordination can lead to data corruption. For instance, if the initial quantity is 1, both nodes might read the quantity as 1, decrement it to 0, and update the record. As a result, the product appears to be in stock when it’s not, leading to incorrect order fulfillment.
- With Lock: A distributed lock ensures that only one node can update the quantity at a time. When a node acquires the lock, it decreases the quantity to 0 and updates the record. Other nodes have to wait until the lock is released before they can perform the update. This guarantees the correctness of the data, preventing data corruption and ensuring that orders are processed accurately.
- More Stability Distributed Locks can also contribute to increased system stability:
- Preventing Invalid State Consumption: Distributed locks act as safeguards, ensuring that only one process or service can modify a shared resource at a given time. This prevents multiple services from simultaneously accessing or modifying the same resource in a way that could lead to an invalid or inconsistent system state.
- Avoiding Race Conditions: In the absence of locks, race conditions can occur when multiple processes try to access and modify shared data concurrently. These race conditions can lead to unpredictable behavior and even crashes. Distributed locks help eliminate such race conditions by providing orderly access to shared resources.
- Enhancing Reliability: By preventing processes from accessing shared resources simultaneously, distributed locks reduce the chances of conflicts and data corruption. This increased reliability can contribute to the overall stability of a distributed system.
To sum up this section, understanding the fundamental reasons behind implementing distributed locks is very important. Efficiency is achieved by preventing redundant work, such as heavy computational tasks, through lock-based resource reservation. Correctness is maintained by preventing data corruption and ensuring that processes do not interfere with each other, guaranteeing accurate system states. Additionally, distributed locks contribute to system stability by averting invalid state consumption, avoiding race conditions, and enhancing overall reliability.
Distributed Locks with Redis
Redis, an open-source, in-memory data store, stands as a versatile and high-performance solution that tackles a wide range of data management tasks. Its capabilities span caching, database functions, and acting as a reliable message broker. With its support for various data structures and operations, along with very high performance, Redis is a strong choice for implementing distributed locks in distributed systems. However, it’s essential to understand that the Redlock algorithm is not 100% accurate and has potential shortcomings – as described later in this post under “Things to Consider Regarding Implementations Based on RedLock Algorithm”.
If you want to dive into caching with Redis in .NET, I recommend checking out my article, ‘Effective Caching with Redis in .NET Core.’
In this section, we explore how can implement distributed locking with Redis, utilizing the RedLock algorithm.
RedLock Algorithm
Implementing distributed locks with Redis often involves the use of an implementation of the RedLock algorithm. The core idea behind the RedLock algorithm is that a client must successfully acquire a lock in at least three master Redis nodes (or a majority of N/2+1 Redis nodes) to claim the lock.
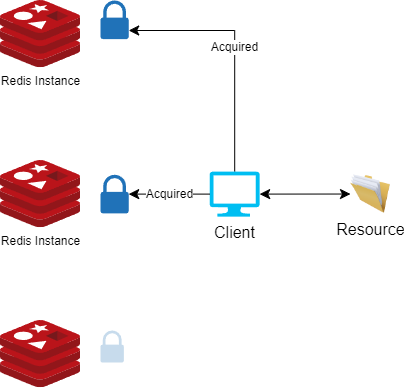
During the lock-acquiring process, the client (library implementing RedLock) uses a small timeout compared to the total lock auto-release time to acquire it, This prevents the client from remaining blocked for a long time trying to talk with a Redis node which is down or unresponsive.
If the client fails to acquire the lock for any reason, or it was not able to acquire the lock in the majority of the nodes, it will try to unlock all the instances.
Project Setup and Implementation
There are many libraries out there implementing the RedLock algorithm for .NET. For this demo, we will be using the RedLock library by Sam Cook. You can find the library on GitHub at https://github.com/samcook/RedLock.net (feel free to check it out).
First, we’ll need several Redis masters running. Using a connection multiplexer, we will create connections to all of them. Once the connections are set up, we can start acquiring locks using the CreateLockAsync method.
For the sake of the demo, we will keep the project small and very basic. However, the same principles apply to large projects.
Before starting our project, we need to spin up three Redis masters, which we will use to acquire locks in at least two of them (See RedLock algorithm).
Use the following docker run commands to start three Redis docker containers:
docker run -d -p 6379:6379 --name redis-1 redis
docker run -d -p 6380:6379 --name redis-2 redis
docker run -d -p 6381:6379 --name redis-3 redis
Now that we have the Docker containers running, we can move on to the implementation part.
Implementation Example – Console application
We will create a basic .Net Core console application, and start by installing the RedLock.Net library using the CLI or your package manager.
After successfully installing the library, the next step is to configure our dependency injection to enable a connection to Redis. To achieve this, we’ll set up the RedLockFactory as a singleton, and provide it with connections to all the Redis masters we’ve launched:
var serviceProvider = new ServiceCollection().AddLogging().AddSingleton < RedLockFactory > (sp =>{
  var multiplexers = new List < RedLockMultiplexer > {
    ConnectionMultiplexer.Connect("localhost:6379"),
    ConnectionMultiplexer.Connect("localhost:6380"),
    ConnectionMultiplexer.Connect("localhost:6381")
  };
  return RedLockFactory.Create(multiplexers);
}).BuildServiceProvider();
The RedLockFactory is a crucial tool for managing distributed locks, and this configuration ensures it’s readily available. Additionally, we’re providing it with access to the three Redis servers we’ve set up. This step equips the RedLockFactory with the necessary connections to efficiently oversee distributed locking in our demonstration.
Let’s consider the scenario where we need to create a FileReaderWriterWithRedLock class for reading or writing data from a shared file. This class will utilize the RedLockFactory we’ve just configured. To ensure efficient resource management, it will also implement the IDisposable interface, allowing us to properly dispose of the RedLockFactory when it’s no longer required.
public class FileReaderWriterWithRedLock: IDisposable {
  // FileReaderWriterWithRedLock - class that reads and writes to a file after acquiring a distributed lock using RedLock.net library
  private readonly string _filePath;
  private readonly RedLockFactory _redLockFactory;

  private TimeSpan defaultExpirationTime = TimeSpan.FromSeconds(5); // 60 seconds
  private TimeSpan defaultWaitTime = TimeSpan.FromSeconds(4); // 10 seconds
  private TimeSpan retryCount = TimeSpan.FromSeconds(3); // 3 times

  private bool disposedValue;

  public FileReaderWriterWithRedLock(string filePath, RedLockFactory redLockFactory) {
    _filePath = filePath;
    _redLockFactory = redLockFactory;

    // create the file if it does not exist
    if (!File.Exists(_filePath)) {
      File.WriteAllTextAsync(_filePath, "BeginContent:");
    }
    else {
      File.AppendAllTextAsync(_filePath, GenerateRandomText());
    }
  }

  // method to generate some random text to be saved in a file as lines
  private string GenerateRandomText() {
    var random = new Random();
    var randomText = string.Empty;
    for (int i = 0; i < 10; i++) {
      randomText += $ "Line {i}: {random.Next(1000)}{Environment.NewLine}";
    }
    return randomText;
  }

  // a public method to try to write to the file after acquiring a lock, while keep trying for 30 seconds until the lock is acquired
  public async Task WriteFileAsync(CancellationToken cancellationToken) {
    Console.WriteLine($ "Thread {Thread.CurrentThread.ManagedThreadId} - Trying to acquire lock...");
    await using(var redLock = await _redLockFactory.CreateLockAsync("data_file", defaultExpirationTime, defaultWaitTime, retryCount, cancellationToken)) {
      if (redLock.IsAcquired) {
        Console.WriteLine($ "Thread {Thread.CurrentThread.ManagedThreadId} - Lock acquired");
        await File.AppendAllTextAsync(_filePath, GenerateRandomText());
      }
      else {
        Console.WriteLine($ "Thread {Thread.CurrentThread.ManagedThreadId} - Could not write to file, Lock not acquired. Retrying ...");
        await WriteFileAsync(cancellationToken);
      }
    }
  }

  // a public method to try to read the file after acquiring a lock, while keep trying for 30 seconds until the lock is acquired
  public async Task < string > ReadFileAsync(CancellationToken cancellationToken) {
    Console.WriteLine($ "Thread {Thread.CurrentThread.ManagedThreadId} - Trying to acquire lock...");
    await using(var redLock = await _redLockFactory.CreateLockAsync("data_file", defaultExpirationTime, defaultWaitTime, retryCount, cancellationToken)) {
      if (redLock.IsAcquired) {
        Console.WriteLine($ "Thread {Thread.CurrentThread.ManagedThreadId} - Lock acquired");
        return await File.ReadAllTextAsync(_filePath);
      }
      else {
        Console.WriteLine($ "Thread {Thread.CurrentThread.ManagedThreadId} - Lock not acquired");
        return await Task.FromResult(" - Lock not acquired - ");
      }
    }
  }

  protected virtual void Dispose(bool disposing) {
    Console.WriteLine($ "Thread {Thread.CurrentThread.ManagedThreadId} - Disposing...");
    if (!disposedValue) {
      if (disposing) {
        // TODO: dispose managed state (managed objects)
        _redLockFactory.Dispose();
      }
      disposedValue = true;
    }
  }

  public void Dispose() {
    // Do not change this code. Put cleanup code in 'Dispose(bool disposing)' method
    Dispose(disposing: true);
    GC.SuppressFinalize(this);
  }
}
In this implementation, what stands out are the WriteFileAsync and ReadFileAsync methods. Before entering the critical section, we create a lock using the RedLockFactory. Then, we ensure that we have successfully acquired the lock before proceeding with any access to the shared file.
Implementation Example – Web API
In this example, we’ll explore a slightly different approach to setting up the RedLockFactory, using configurations loaded from a file. Additionally, we’ll utilize EndPoints to establish connections to Redis, offering greater flexibility and customization.
Our project will include a DataWorker class responsible for the actual file reading and writing, a RedisHandler class serving as a connection wrapper for Redis, including the locking mechanism, and a RedisSettings class, which is a straightforward C# class designed to store the configurations we’ve read.
We’ll start by creating a Web API application, and add the RedLock.Net library using the CLI (or your package manager).
Next, we can now move on to configuring our services in program.cs file to make use of the RedLockFactory:
var configuration = new ConfigurationBuilder()
    .SetBasePath(Directory.GetCurrentDirectory())
    .AddJsonFile("appsettings.json")
    .Build();

builder.Services.Configure<RedisSettings>(configuration.GetSection("RedisSettings"));

// Add services to the container.

builder.Services.AddControllers();
// Learn more about configuring Swagger/OpenAPI at https://aka.ms/aspnetcore/swashbuckle
builder.Services.AddEndpointsApiExplorer();
builder.Services.AddSwaggerGen();

builder.Services.AddLogging(logger => logger.AddConsole());
builder.Services.AddSingleton<IDataWorker, DataWorker>();
builder.Services.AddSingleton<IRedisHandler, RedisHandler>();
To configure Redis settings, add a RedisSettings section to your appsettings.json file:
"RedisSettings": {
  "RedisEndpoints": [
    "127.0.0.1:6379", // Replace with your Redis server's IP address and port
    "127.0.0.1:6380", // Add more endpoints for Redis replication or clustering
    "127.0.0.1:6381"
  ],
  "InstanceName": "mynamespace",
  "Password": "your-redis-password", // If your Redis server requires authentication
  "MaxRetries": 3,
  "MinDelayBetweenRetries": "00:00:00.500", // Optional: Minimum delay between retry attempts
  "Database": 0 // Redis database number to use
}
Next, create the RedisSettings class to store these configurations:
public class RedisSettings
{
    public string[] RedisEndpoints { get; set; }
    public string InstanceName { get; set; }
    public string Password { get; set; }
    public int MaxRetries { get; set; }
    public TimeSpan MinDelayBetweenRetries { get; set; }
    public int Database { get; set; }
    public int ConnectTimeout { get; set; } = 5000;
}
Now, let’s dive into the implementation of the RedisHandler class. In this class, we’ll inject the RedisSettings into the constructor and use the CreateRedLockFactory method to initialize a connection to Redis.
The CreateRedLockFactory method will iterate through all the specified endpoints, creating a connection to Redis using ConnectionMultiplexer, and ultimately, it will create an instance of the RedLockFactory.
The RedisHandler class exposes a public method named PerformActionWithLock. This method accepts a resource as a string, an expiration time, a wait time, and a retry time as TimeSpan objects. Additionally, it takes an Func<Task> action as a parameter. It wraps the provided action delegate within a locked section, ensuring the safe execution of the action.
The RedisHandler class implementation:
public class RedisHandler : IRedisHandler, IDisposable
{
    private readonly RedLockFactory redLockFactory;
    private bool disposedValue;
    private readonly IOptions<RedisSettings> redisSettings;
    private readonly ILogger<RedisHandler> _logger;

    public RedisHandler(IOptions<RedisSettings> RedisSettings, ILogger<RedisHandler> logger)
    {
        redisSettings = RedisSettings;
        redLockFactory = CreateRedLockFactory();
        _logger = logger;
    }

    private RedLockFactory CreateRedLockFactory()
    {
        var configurtaion = redisSettings.Value;

        var connectionMultiplexers = new List<RedLockMultiplexer>();
        foreach(var endpoint in configurtaion.RedisEndpoints)
        {
            var connectionMultiplexer = ConnectionMultiplexer.Connect(new ConfigurationOptions
            {
                EndPoints = { endpoint },               // can be IP:Port or DNS name "redis1.host.com:6379", This is the server endpoint to connect to
                Password = configurtaion.Password,      // DO NOT USE IN PRODUCTION - only for testing
                ConnectTimeout = configurtaion.ConnectTimeout,
                AbortOnConnectFail = false, // don't want failures to sever connection
                AllowAdmin = true,  // needed for the info command used for lock debugging
                SyncTimeout = 5000, // milliseconds, default is 5 seconds
            });
            connectionMultiplexers.Add(connectionMultiplexer);
        }

        return RedLockFactory.Create(connectionMultiplexers);

    }

    public async Task<bool> PerformActionWithLock(string resource, TimeSpan expirationTime, TimeSpan waitTime, TimeSpan retryCount, Func<Task> action)
    {
        await using (var redLock = await redLockFactory.CreateLockAsync(resource, expirationTime, waitTime, retryCount))
        {
            if (!redLock.IsAcquired)
            {
                _logger.LogError($"Could not acquire lock for resource {resource}");
                return false;
            }

            _logger.LogDebug($"Lock acquired for resource {resource}");
            await action();

            return true;

        }
    }

    protected virtual void Dispose(bool disposing)
    {
        if (!disposedValue)
        {
            if (disposing)
            {
                _logger.LogDebug("Disposing RedisHandler");
                redLockFactory?.Dispose();
            }
            disposedValue = true;
        }
    }


    public void Dispose()
    {
        // Do not change this code. Put cleanup code in 'Dispose(bool disposing)' method
        Dispose(disposing: true);
        GC.SuppressFinalize(this);
    }
}
Now, let’s take a look at the DataWorker class implementation. It’s a straightforward class and doesn’t require manual locking:
public class DataWorker : IDataWorker
{

    private readonly string dataFile = "data.txt";
    private readonly ILogger<DataWorker> logger;

    public DataWorker(ILogger<DataWorker> logger)
    {
        this.logger = logger;
    }

    public async Task WriteData(string someText)
    {
        if (!File.Exists(dataFile))
        {
            logger.LogDebug($"Creating file {dataFile}");
            await File.WriteAllTextAsync(dataFile, someText);
        }
        else
        {
            logger.LogDebug($"Appending to file {dataFile}");
            await File.AppendAllTextAsync(dataFile, someText);
        }
    }

    public async Task<string> ReadAll()
    {
        if (File.Exists(dataFile))
        {
            logger.LogDebug($"Reading file {dataFile}");
            return await File.ReadAllTextAsync(dataFile);
        }

        logger.LogDebug($"File {dataFile} does not exist");
        return string.Empty;
    }
}
And that’s it! Now, whenever you need to execute an action within a ‘locked’ scope, you can do so like this:
var result = await _redisHandler
    .PerformActionWithLock("WriteData", TimeSpan.FromSeconds(10), TimeSpan.FromSeconds(10), TimeSpan.FromSeconds(10), async () =>
    {
    await _dataWorker.WriteData(data);
});
This enables the safe execution of actions within a protected scope.
 Things to Consider Regarding Implementations Based on RedLock Algorithm
While the RedLock algorithm offers a robust solution for distributed locking, there are important considerations to keep in mind when using it in your projects. These considerations relate to potential issues with the RedLock algorithm and the nature of distributed systems:
1. Fencing Tokens
One significant challenge with the RedLock algorithm is the absence of a facility for generating fencing tokens. In the absence of fencing tokens, it’s challenging to prevent race conditions between clients, especially when one client experiences pauses or delayed network communication. As a result, the algorithm lacks a guaranteed mechanism for generating unique identifiers that increase each time a client acquires a lock.
2. Clock Synchronization
Redis relies on the system’s gettimeofday function to determine the expiration of keys. This system time, however, is not guaranteed to be monotonic, meaning it can exhibit discontinuous jumps or even time reversals. These discontinuous jumps can occur due to various reasons, such as manual adjustments by administrators or clock adjustments from NTP servers. Therefore, when using the RedLock algorithm, it’s important to be aware of potential time inconsistencies that may affect lock expiration.
3. Synchrony Assumptions
The RedLock algorithm operates effectively only under a synchronous system model, which assumes certain properties:
- Bounded Network Delay: The system must guarantee that network packets arrive within a specified maximum delay.
- Bounded Process Pauses: The system must adhere to hard real-time constraints, which are typically found in specific applications like car airbag systems.
- Bounded Clock Error: Clock drift or error should be limited, ideally within a known, fixed upper bound.
In summary, the RedLock algorithm is a powerful tool for managing distributed locks in a distributed environment. Still, it’s essential to be aware of these considerations and take necessary precautions to ensure the reliable operation of your distributed systems.
Distributed Locks with Redis – Summary
In this section, we’ve explored the implementation of distributed locking with Redis, leveraging the RedLock algorithm. Redis, as a versatile and high-performance in-memory data store, offers a powerful solution for a wide range of data management tasks, including caching, database functions, and acting as a reliable message broker. With its support for various data structures and operations, it’s a strong choice for distributed locks in complex, distributed systems.
Distributed Locks with ZooKeeper
Apache ZooKeeper is a highly reliable distributed coordination service, designed to allow distributed applications to coordinate with each other. It acts as the conductor of a complex symphony, ensuring that different processes, nodes, and services can synchronize their actions and make collective decisions seamlessly.
With its ability to maintain a centralized configuration and consensus, ZooKeeper plays a pivotal role in achieving, maintaining, and simplifying the coordination and orchestration of distributed systems.
ZooKeeper Core Concepts
To understand the fundamentals of ZooKeeper and how it works at a high level, we’ll go through its core principles and explore how it can be used as a robust, reliable, and scalable distributed locking mechanism in distributed systems.
At its heart, ZooKeeper enables coordination through a hierarchical namespace of data registers, referred to as ‘znodes.’ This structure is conceptually similar to a typical file system, where names are sequences of path elements separated by slashes (‘/’). In ZooKeeper’s namespace, each znode is uniquely identified by its path.
The core building blocks of ZooKeeper we need to keep in mind are:
- Znodes: ZooKeeper’s fundamental building blocks are znodes, which can be thought of as small, lightweight data nodes that can store information. These znodes are organized hierarchically, creating a tree-like structure. This structure is utilized for various purposes, including distributed locking.
- Sequential znodes: One key aspect is the ability to create znodes with sequential ordering. When a client requests to create a znode, ZooKeeper appends a unique sequence number to the znode’s name. This sequential ordering ensures that znodes are created in a predictable, ordered manner.
- Ephemeral znodes: ZooKeeper also supports ephemeral znodes, which exist only for the duration of a client’s session. If the client disconnects or its session ends, the ephemeral znodes associated with it are automatically deleted. This feature is crucial for distributed locking, as it enables a simple way to implement lock ownership and automatic lock release if the owning client disconnects.
- Watch Mechanism: ZooKeeper provides the concept of “watches”, allowing to clients to subscribe to a watch on a znode. When that watch is triggered, the client will get notified of the change in the znode.
- Consensus-Based (Quorum-Based) Architecture: This is where ZooKeeper strength shines. In this setup, when a change is requested, like a client asking to lock something using a znode, it needs approval from most of the servers in the ZooKeeper cluster, often referred to as an ensemble. This approach is the backbone of the system’s strength and reliability. Even if a few servers face problems, the system continues to work smoothly as long as most servers are up and running. This resilience is a defining feature of ZooKeeper, ensuring consistent performance and data integrity in distributed systems.
How Distributing Locks Works With ZooKeeper?
In the ZooKeeper distributed lock mechanism, a lock is implemented using temporary sequential nodes (znodes). When a client requests a lock, it corresponds to creating a node within the ZooKeeper namespace. This newly created node is temporary and sequential, which ensures that clients can acquire locks in a fair and orderly manner.
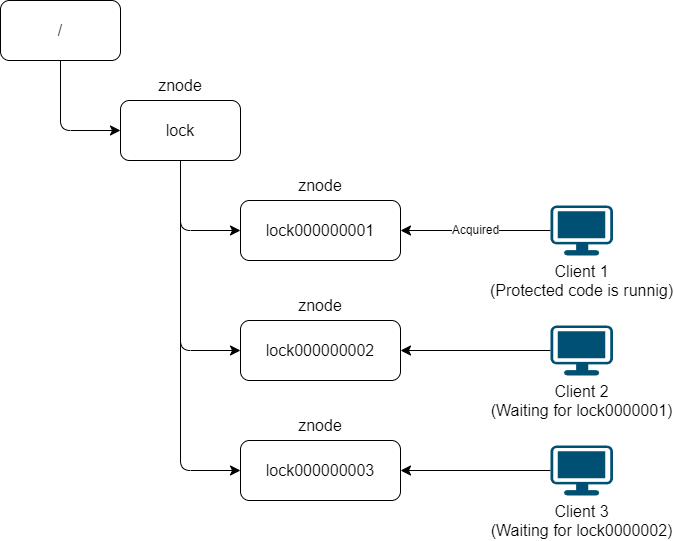
When multiple clients simultaneously request locks, a series of temporary sequential nodes are created under the same lock node in ZooKeeper. However, only the client whose node has the lowest sequential number can successfully acquire the lock, effectively achieving mutual exclusion. Other clients monitor the changes of the node with the next lower sequential number in order to be notified when the lock is released.
Project setup and Implementation
Having covered the fundamental concepts of ZooKeeper, let’s explore a practical implementation example. In this demonstration, we’ll see how to use ZooKeeper for distributed locking within a .NET Core web API project. For the sake of simplicity, we’ll be utilizing a single Docker-based ZooKeeper instance.
While it’s important to note that a real-world scenario typically involves multiple ZooKeeper instances running on different machines, forming what is known as a ZooKeeper ensemble, the principles we’ll discuss apply equally to distributed ZooKeeper environments.
To get started, the first step is to obtain the latest ZooKeeper Docker image from the official Docker Hub repository and initiate the container:
docker run --name zookeeperSA -p 8080:8080 -p 2181:2181 --restart always -d zookeeper
Here, port 8080 is designated for management purposes using ZooNavigator, while port 2181 serves as the client connection port. This setup will enable us to comprehensively investigate the capabilities of ZooKeeper in a straightforward manner, providing a foundation for more complex distributed scenarios
Optionally, once this is completed, we can also obtain and launch ZooNavigator, which is a web-based ZooKeeper UI and browser. Execute the following Docker command:
docker run -d -p 9000:9000 -e HTTP_PORT=9000 --name zoonavigator \
--restart unless-stopped \
  elkozmon/zoonavigator:latest
Implementation example – Web API
To keep this port short, we won’t demonstrate how to create a locking mechanism from the ground up using ZooKeeper. Instead, we’ll utilize a NuGet package developed by madelson, which handles ZooKeeper-based locking for us behind the scenes.
If you’re interested in building your custom locking mechanism in .NET, I’d suggest considering ZooKeeperNet and ZooKeeperNetEx by shayhatsor (link provided below).
Now, for the exciting part!
Let’s imagine we have an API controller responsible for users adding items to the inventory. The controller offers two endpoints (once again, to maintain simplicity, we’ll keep the controller’s structure basic and straightforward). The controller provides only POST and GET endpoints.
[ApiController]
[Route("[controller]")]
public class Inventory: Controller {
  private readonly IInventoryService inventoryService;

  public Inventory(IInventoryService inventoryService) {
    this.inventoryService = inventoryService;
  }

  [HttpGet]
  public async Task<IActionResult> Get(CancellationToken cancellationToken) {
    return Ok(await inventoryService.GetAll(cancellationToken));
  }

  [HttpGet("{id}")]
  public async Task<IActionResult> Get(int id, CancellationToken cancellationToken) {
    return Ok(await inventoryService.Get(id, cancellationToken));
  }

  [HttpPost]
  public async Task<IActionResult> Post([FromBody] InventoryItem item, CancellationToken cancellationToken) {
    return Ok(await inventoryService.Add(item, cancellationToken));
  }
}
The controller has minimal responsibilities and does not concern itself with locking or data retrieval. Instead, these responsibilities fall under the purview of the InventoryService. The InventoryService employs a locking mechanism to guarantee that when accessing data, only one process (node) does so at any given time.
The InventoryService –
public class InventoryService : IInventoryService
{
    // In-memory inventory mock
    private static List<InventoryItem> inventoryDB = new List<InventoryItem>
    {
        new InventoryItem { Id = 1, Name = "Item 1", StockCount = 10 },
        new InventoryItem { Id = 2, Name = "Item 2", StockCount = 20 },
        new InventoryItem { Id = 3, Name = "Item 3", StockCount = 30 },
        new InventoryItem { Id = 4, Name = "Item 4", StockCount = 40 },
        new InventoryItem { Id = 5, Name = "Item 5", StockCount = 50 },
    };

    private readonly IDistributedLockProvider distributedLockProvider;
    private readonly ILogger<InventoryService> logger;

    public InventoryService(ILogger<InventoryService> logger, IDistributedLockProvider distributedLockProvider)
    {
        this.logger = logger;
        this.distributedLockProvider = distributedLockProvider;
    }

    public async Task<InventoryItem> Add(InventoryItem item, CancellationToken cancellationToken)
    {
        logger.LogDebug($"Adding item {item}");
        await using (await distributedLockProvider.TryAcquireLockAsync("inventory_lock", TimeSpan.FromSeconds(10), cancellationToken))
        {
            var inventory = inventoryDB;
              if (inventory.Any(i => i.Id == item.Id))
            {
                throw new Exception($"Item with id {item.Id} already exists");
            }

            inventory.Add(item);
            // demo update inventory
            await Task.Delay(500);

            return item;
        }
    }

    public async Task<InventoryItem> Get(int id, CancellationToken cancellationToken)
    {
        // get inventory item by id with lock protection
        logger.LogDebug($"Getting item with id {id}");
        await using (await distributedLockProvider.TryAcquireLockAsync("inventory_lock", TimeSpan.FromSeconds(10), cancellationToken))
        {
            var inventory = inventoryDB;
            var item = inventory.FirstOrDefault(i => i.Id == id);
            if (item == null)
            {
                throw new Exception($"Item with id {id} does not exist");
            }

            return item;
        }
    }

    public Task<IEnumerable<InventoryItem>> GetAll(CancellationToken cancellationToken)
    {
        logger.LogDebug("Getting all items");
        if (cancellationToken.IsCancellationRequested)
        {
            return Task.FromCanceled<IEnumerable<InventoryItem>>(cancellationToken);
        }

        return Task.FromResult<IEnumerable<InventoryItem>>(inventoryDB);
    }
}
The InventoryService is at the heart of managing our inventory in the application. It handles tasks like adding new items, finding specific ones, and listing everything in stock.
To keep things running smoothly and prevent any issues from multiple processes accessing the inventory at once, we rely on the distributedLockProvider. It helps us apply distributed locking with ZooKeeper, making sure only one operation can work with the inventory data at a time.
We should mention the key player here – the DistributedLock.ZooKeeper NuGet package by madelson. It becomes quite noticeable when we use distributedLockProvider.TryAcquireLockAsync to secure exclusive access to the inventory
It’s worth noting that, for simplicity in this demo, we’re using an in-memory data structure (called inventoryDB) to manage the inventory.
Dependency Injection and service setup
We need to ensure our services are properly setup in program.cs, so we are able to use them throughout our application (Please note this is very basic setup, for demonstration purposes only):
builder.Services.AddScoped<IInventoryService, InventoryService>();
builder.Services.AddSingleton<IDistributedLockProvider>(new ZooKeeperDistributedSynchronizationProvider("localhost:2181",
    options => options.ConnectTimeout(TimeSpan.FromSeconds(5))));
Implementation Example #2 – Using the ZooKeeper .NET Client Directly
In the previous example, we learned how to work with ZooKeeper using the DistributedLock.ZooKeeper NuGet package by madelson. However, you can also communicate and work with ZooKeeper using one of the excellent existing .NET clients, known as ZooKeeperNet and ZooKeeperNetEx.
In this section, we will provide a brief overview of this alternative approach.
The complete code for this example is available in the GitHub repository: HamedSalameh/blog-distributed-locks: An example solution for implementing distributed locks with Redis and ZooKeeper (github.com).
Since this post has already gotten long enough, we will focus on key parts of the implementations.
DistributedLockProvider
In this section, we’ll delve into the essential components of the DistributedLockProvider class, which acts as the central control hub for working with ZooKeeper in the context of distributed locks. This class implements the IDistributedLockProvider interface:
public interface IDistributedLockProvider
{
    Task<bool> AcquireLockAsync(string path, CancellationToken cancellationToken);
    void Close();
    bool Connect(CancellationToken cancellationToken);
    string CreateLock(string path);
    Task<string[]> GetChildrenAsync(string path, bool order = false);
    Task<string[]> GetChildrenByAbsolutePathAsync(string absolutePath, bool order = false);
    bool Lock(string path, CancellationToken cancellationToken);
    Task<bool> LockAsync(string path, CancellationToken cancellationToken);
}
The **Connect**method allows for opening a connection to ZooKeeper client.
**CreateLock**method will be used to create a znode representing the lock, and the **LockAsync**wil do the actual locking.
Class construction:
public DistributedLockProvider(IOptions<DistributedLockOptions> options)
{
    if (options == null)
    {
        throw new ArgumentNullException(nameof(options));
    }

    if (string.IsNullOrEmpty(options.Value.Address))
    {
        throw new ArgumentNullException(nameof(options.Value.Address));
    }

    if (options.Value.SessionTimeout < 1000)
    {
        throw new ArgumentOutOfRangeException("sessionTimeout must be greater than 1000");
    }

    Address = options.Value.Address;
    SessionTimeout = options.Value.SessionTimeout;
    CurrentPath = pathSeperator;
}

public DistributedLockProvider(string address, int sessionTimeout = 10000)
{
    if (sessionTimeout < 1000)
    {
        throw new ArgumentOutOfRangeException("sessionTimeout must be greater than 1000");
    }

    Address = address;
    SessionTimeout = sessionTimeout;
    CurrentPath = pathSeperator;
}
Next, implementing the connection to ZooKeeper:
public bool Connect(CancellationToken cancellationToken)
{
    if (Connected)
    {
        return true;
    }

    if (zookeeper == null)
    {
        lock (this)
        {
            defaultWatcher = defaultWatcher ?? new DefaultWatcher(are);
            are.Reset();
            zookeeper = new ZooKeeper(Address, SessionTimeout, defaultWatcher);

            // Check for cancellation before waiting
            if (cancellationToken.IsCancellationRequested)
            {
                return false;
            }

            are.WaitOne(SessionTimeout);
        }
    }

    if (cancellationToken.IsCancellationRequested)
    {
        Close();
        return false;
    }

    if (!Connected)
    {
        return false;
    }

    OnConnected?.Invoke();

    return true;
}
Once the connection is successfully established, we trigger “OnConnected” event to signal that the connection is ready for use, and it returns true, indicating a successful connection process.
The are.WaitOne(SessionTimeout) line in the code instructs the current thread to wait for the AutoResetEvent to be signaled. This effectively puts the thread to sleep until the connection is established or a timeout occurs. When the connection is established (or if a timeout happens), the AutoResetEvent is signaled, allowing the waiting thread to continue its execution.
Creating the znodes needed to lock is done with the CreateLock method:
public string CreateLock(string path)
{
    if (path.Contains("/"))
    {
        throw new ArgumentException("invalid path");
    }
    return SetData(path, "", false, true);
}

public string SetData(string path, string value, bool persistent = false, bool sequential = false)
{
    return SetDataAsync(path, value, persistent, sequential).GetAwaiter().GetResult();
}

public async Task<string> SetDataAsync(string path, string value, bool persistent = false, bool sequential = false)
{
    path = Combine(CurrentPath, path);
    return await SetDataByAbsolutePathAsync(path, value, persistent, sequential);
}

public async Task<string> SetDataByAbsolutePathAsync(string absolutePath, string value, bool persistent = false, bool sequential = false)
{
    if (!Connected)
    {
        throw new Exception("Connection is not connected");
    }
    if (!CanWrite)
    {
        throw new Exception("Connection is readonly mode");
    }

    absolutePath = Combine(absolutePath);

    var splits = absolutePath.Split(new string[] { pathSeperator }, StringSplitOptions.RemoveEmptyEntries);
    for (var i = 0; i < splits.Length - 1; i++)
    {
        var path = Combine(splits.Take(i + 1).ToArray());
        if (await zookeeper.existsAsync(path, false) == null)
        {
            await zookeeper.createAsync(path, new byte[0], defaultACL, persistent ?
               sequential ? CreateMode.PERSISTENT_SEQUENTIAL : CreateMode.PERSISTENT :
               sequential ? CreateMode.EPHEMERAL_SEQUENTIAL : CreateMode.EPHEMERAL);
        }
    }


    if (await zookeeper.existsAsync(absolutePath, false) == null)
    {
        absolutePath = await zookeeper.createAsync(absolutePath, Encoding.GetBytes(value), defaultACL, persistent ?
            sequential ? CreateMode.PERSISTENT_SEQUENTIAL : CreateMode.PERSISTENT :
            sequential ? CreateMode.EPHEMERAL_SEQUENTIAL : CreateMode.EPHEMERAL);
    }
    else
    {
        await zookeeper.setDataAsync(absolutePath, Encoding.GetBytes(value));
    }
    return absolutePath.Split(new string[] { pathSeperator }, StringSplitOptions.RemoveEmptyEntries).LastOrDefault();
}
CreateLock function calls SetData after some basic validation for the path (which under it we will create the node). SetData() and SetDataAsync()`` eventually call **SetDataByAbsolutePathAsync`** which does the actual creation of znode and writes any data to ZooKeeper. It ensures that the connection is established and the ZooKeeper client can write data. It handles the creation of intermediate path elements, if needed, and finally creates the node with the specified data.
Now that we have created the znode, we need to check if we have the lowest znode index. If we have the lowest index, the lock is acquired; otherwise, we can either wait or set a watcher. For the sake of simplicity in this example, we will keep things straightforward.
public async Task<bool> AcquireLockAsync(string path, CancellationToken cancellationToken)
{
    Connect(cancellationToken);

    var lockHandler = await SetDataAsync(path, "", false, true);
    if (lockHandler != null)
    {
        return await LockAsync(lockHandler, cancellationToken);
    }
    return false;
}

public async Task<bool> LockAsync(string path, CancellationToken cancellationToken)
{
    if (cancellationToken.IsCancellationRequested)
    {
        return false;
    }

    var array = await GetChildrenAsync("", true);
    if (array != null && array.Length > 0)
    {
        var first = array.FirstOrDefault();
        if (first == path)
        {
            return true;
        }

        var index = array.ToList().IndexOf(path);
        if (index > 0)
        {
            var are = new AutoResetEvent(false);
            // Here we can set node watchers to get notified when the previous node is deleted
            are.Dispose();
        }
        else
        {
            throw new InvalidOperationException($"no locker found in path");
        }
    }
    return true;
}
The GetChildrenAsync method retrieves the children of a ZooKeeper node and, if required, orders them based on their creation time (ctime). This ordering ensures that children are processed in a specific sequence.
In summary, these methods provide the essential functionality to create and manage lock nodes in ZooKeeper, giving us control over data persistence and sequential behavior.
Using AcquireLockAsync:
using (DistributedLockProvider locker = new DistributedLockProvider(options))
{
    if (await locker.AcquireLockAsync("lock", cancellationToken))
    {
        // Safely retrieve inventory items with lock protection
        items = inventoryDB;
    }
}
or we can directly call CreateLock and Lock:
using (DistributedLockProvider locker = new DistributedLockProvider(options))
{
    var _lock = locker.CreateLock("lock");
    var lockAcquired = locker.Lock(_lock, cancellationToken);

    if (!lockAcquired)
    {
        throw new Exception("Could not acquire the lock");
    }

    // Perform your tasks here

    if (item == null)
    {
        throw new Exception($"Item with id {id} does not exist");
    }

    return item;
}
Choosing between ZooKeeper and Redis
When deciding between ZooKeeper and Redis for distributed locking, consider the following factors:
- Complexity of Coordination: If your use case involves complex orchestration, leader election, and hierarchical data structures, ZooKeeper’s features can be a better fit.
- Reliability and Consistency: If strong consistency and resilience are top priorities with critical importance, ZooKeeper’s consensus-based architecture offers those guarantees.
- Real-Time Notifications: If your application relies on real-time notifications of data changes, ZooKeeper’s watch mechanism is beneficial.
- Performance and Simplicity: For simpler use cases with a focus on high performance and versatility, Redis with the RedLock algorithm could be a straightforward choice.
- Ecosystem Integration: Consider whether you’re already using Redis for other purposes in your application. Leveraging Redis for distributed locking can streamline your technology stack.
- Ease of Deployment and Maintenance: Consider the ease of deploying and maintaining the chosen technology. Redis is often simpler to set up and manage compared to ZooKeeper, which may require more configuration and expertise.
- Scalability: Think about the scalability requirements of your application. Both Redis and ZooKeeper can be used in distributed environments, but Redis is particularly known for its ability to scale horizontally with ease.
- Persistence: Redis is primarily an in-memory data store. While it offers various persistence options, ZooKeeper provides a more robust solution for data persistence, which can be crucial for some use cases.
In summary, both ZooKeeper and Redis are solid solutions for distributed locking, each with its own set of strengths and considerations. When choosing between them, it’s essential to carefully evaluate your specific use cases, project needs, and constraints.
While Redis offers low-latency access, simplicity, and easy integration into various ecosystems, ZooKeeper provides strong consistency, reliability, and data persistence.
Reference
How to do distributed locking — Martin Kleppmann’s blog
The Technical Practice of Distributed Locks in a Storage System – Alibaba Cloud Community
ZooKeeper References:
ProjectDescription – Apache ZooKeeper – Apache Software Foundation
ZooKeeper: Because Coordinating Distributed Systems is a Zoo (apache.org)
Libraries & Code reference
ZooKeeper docker image: zookeeper – Official Image | Docker Hub
DistributedLock package implementation by madelson : madelson/DistributedLock: A .NET library for distributed synchronization (github.com)
ZooKeeper .Net Client by Shayhatsor : hayhatsor/zookeeper: Apache ZooKeeper .NET async Client (github.com)
Cover image by Jan Prokes