
Elasticsearch is a well-known, and widely used search engine and the heart of the Elastic Stack. Known for its performance and scalability, Elasticsearch is a robust solution for conducting search and analytics on your data, offering a mature set of features and capabilities tailored to various use cases. In this blog post, we’ll cover the fundamental concepts of Elasticsearch and its functionality. Then, we’ll move on to practical examples in .NET, demonstrating how to use Elasticsearch for full-text search and log analysis.
Understanding Elasticsearch
Before we dive into practical code examples and demos, it’s important to understand a few core concepts in Elasticsearch, that will set the ground for the rest of this post.
Core Concepts
- Document: A document is a unit of data, structured in JSON format, holding the information that we can query for in key-value pairs of fields and their values.
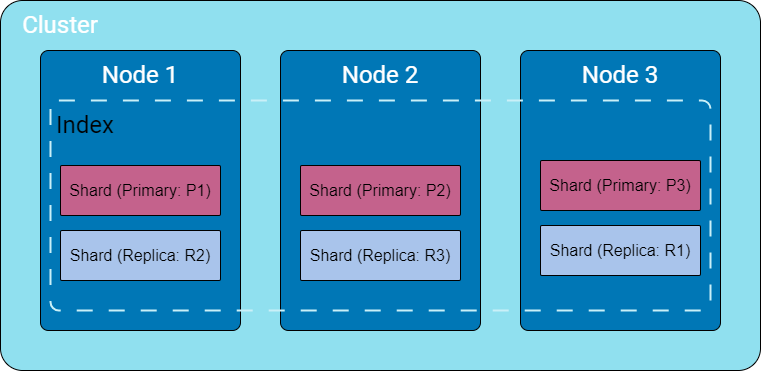
- Index: A group of logically related documents. It’s the largest data unit in Elasticsearch, spanning multiple shards and nodes.
- Shard: Is part of the index stored in a specific node (Usually each node has one shard). Sharding enables horizontal scaling by distributing the index data across multiple nodes. It is the basic scaling unit for Elasticsearch. As documents are added to the index, it is routed to a shard. (We can think of a shard as “where the data is stored”).
- Node and Replicas: A node is a single Elasticsearch instance, running on a machine. It can be a physical server, a virtual server, or even a docker container. Each node can either be a primary or a replica of a certain shard. A replica node is a copy of the primary node. and provide fault-tolerant capabilities to the Elasticsearch cluster.
- Cluster: A collection of nodes working together to store data, and provide search and indexing capabilities. A cluster enables Elasticseach to be highly available and scalable).
- Mapping: This is the process of identifying the document fields and their types, so they can be stored, indexed, and searched effectively. (i.e. date field, string field, etc…).
- Aggregation: Provide the ability to group and summarize the data as metrics, statistics, and so on.
- Bucket: Used within aggregation, a bucket can be thought of as “sub-aggregation”. A Bucket is the building block of an aggregation, where it can group documents according to a defined rule, for example, a daily bucket, or weekly bucket.
Data flow in ElasticSearch

Now that we covered some basic core concepts, let’s explore the data flow in Elasticsearch: what happens when the data is sent to Elastic Search? how is it stored?
Step 1: Data Ingestion
- This is the initial setup where external data is sent to Elasticsearch for storage and analysis.
- The data can be sent through various methods, such as using the REST API, the Elasticsearch client, or tools like Logstash for log processing and collection.
- The data is typically sent as a JSON document with fields and values
Step 2: Indexing
- When the data reaches Elasticsearch, it goes through a process of indexing. The index is the core data structure that organizes and stores the documents.
- During the indexing process, Elasticsearch creates an inverted index data structure for fast full-text searches.
Step 3: Tokenization and Analysis
- Text fields within the documents undergo tokenization and analysis.
- Tokenization involves breaking down the text into individual terms, or tokens. For example, a sentence may be tokenized into individual words.
- This is where different text analyzers are applied to the text, which can perform tasks like lowercase transformation, stemming, punctuation stop-word handling, and more.
Note on configuring the tokenization process:
Elasticsearch provides the ability to control and configure the tokenization process by providing defining and creating custom analyzers. Analyzers in Elasticsearch consist of three main components: character filters, tokenizers, and token filters, and we can customize each of these components based on the use case.
Note on mappings:
- Dynamic Mapping: Elasticsearch can be schema-less, allowing documents to be indexed without explicit field handling. This mapping automatically detects and adds new fields to the index. However, Elasticsearch might not “guess” the exact mapping type for all the fields, so it’s a good practice to review the data structure being sent and provide custom mappings as needed.
- Custom Mapping: In custom mapping, we can define mappings to the data fields, and explicitly specify how fields are stored and indexed. This enables distinctions between string fields, language-specific text analysis, optimization for partial matching, custom date formats, and the use of specific data types like geo_point.
Step 4: Storing and Sharding
- Sharding is the process of breaking an index into smaller pieces, each stored on a separate node in the Elasticsearch cluster.
- As documents are added to the index, it is routed to a shard. By default, this is done in a round-robin fashion, based on the hash of the document’s id.
- Optionally, replicas of each shard are created. Replicas serve as backups and improve fault tolerance. Replicas are distributed across different nodes, ensuring data availability even if some nodes fail.
Once the data is indexed and stored in the cluster, it is ready for search and retrieval. Searching can be very simple query, or complex aggregations, depending on the use case and our needs.
Setting Up the Environment
To keep things simple and focus on working with Elasticsearch from .NET, we will set up an ELK stack using Docker Compose. The stack will include a single Elasticsearch instance, Kibana, and Logstash.
A ready-to-use Docker Compose file can be found on the web and GitHub similar to the following :
deviantony/docker-elk: The Elastic stack (ELK) powered by Docker and Compose. (github.com)
docker-elk/docker-compose.yml at main · deviantony/docker-elk (github.com)
After setting up the ELK stack, it’s essential to add some initial data to perform queries. The ELK stack provides three sets of sample data that can be loaded from the home page upon logging into Kibana. To inject the data, open your browser and navigate to localhost:5601. After logging in, look for the ‘Add sample data’ option in the ‘Get Started by adding integrations’ section.
Elasticsearch and .NET Core
Establishing Connections to Elasticsearch from .NET Core
In this blog post, we will use the latest Elasticsearch .NET client, Elastic.Clients.Elasticsearch specifically version 8.11.0 at the time of writing this post. Note that this is not the well-known NEST client, which is currently at version 7.17.
dotnet add package Elastic.Clients.Elasticsearch --version 8.11.0
Once the NuGet package ‘Elastic.Clients.Elasticsearch’ is successfully installed, we can proceed to configure and establish a connection with Elasticsearch.
To keep things simple, we will use a single-node Elasticsearch cluster with Kibana. You can grab the docker-compose file from Elasticsearch-Kibana docker-compose gist. (adapted from Getting started with the Elastic Stack and Docker-Compose | Elastic Blog)
Indexing and CRUD Operations
Elasticsearch offers a versatile API for managing indexes, covering a variety of tasks such as basic CRUD operations, status monitoring, and more. In this section, we’ll explore these API functions to demonstrate how to easily create, retrieve, or delete an index.
Working with Indexes
There are multiple ways to create an index in Elasticsearch, depending on the specific requirements. For instance, to create a basic index with default settings and mapping, you can use the CreateAsync method and provide the index name:
var response = await _client.Indices.CreateAsync(indexName, cancellationToken);
If you need to create an index with custom mappings and settings, the CreateIndexRequestDescriptor comes in handy:
var descriptor = new CreateIndexRequestDescriptor(indexName).
    Mappings(m => m
        .Properties(new Properties
        {
            {"FlightNum", new TextProperty() {Analyzer = "standard"}},
            {"FlightCode", new KeywordProperty {IgnoreAbove = 6}}
        }));

var response = await _client.Indices.CreateAsync(descriptor, cancellationToken);
return response.IsValidResponse;
In this example, we’re creating an index named ‘flights’ with custom type mappings, specifically ignoring any keyword longer than 6 characters.
Additionally, you can provide index settings and type mapping like this:
createIndexRequest.Settings = new IndexSettings()
{
    NumberOfShards = 1,
    NumberOfReplicas = 2
};
createIndexRequest.Mappings = new TypeMapping()
{
    Properties = new Properties()
    {
        {"FlightNum", new TextProperty() {Analyzer = "standard"}},
        {"FlightCode", new KeywordProperty {IgnoreAbove = 6}}
    }
};

var response = await _client.Indices.CreateAsync(createIndexRequest);
return response.IsValidResponse;
For more in-depth information and a comprehensive list of configuration options, please consult the official Elasticsearch documentation.
Working with Documents
Now that we have explored the basics of working with indexes, let’s proceed to exploring documents.
Indexing a document
Indexing a document involves adding a JSON document to the specified data stream, making it searchable. The ‘Index’ API serves both documents and indexes. If the target is an index and the document already exists, the request updates the document version.
Here’s an example of indexing a single document, in this case, flight data:
public async Task<bool> IndexDocumentAsync(string indexName, Flight flight, CancellationToken cancellationToken)
{
    if (string.IsNullOrWhiteSpace(indexName))
    {
        throw new ArgumentNullException(nameof(indexName));
    }
    if (flight == null)
    {
        throw new ArgumentNullException("Indexing null document is not allowed");
    }
    var response = await _client.IndexAsync(flight, idx => idx.Index(indexName), cancellationToken);
    return response.IsValidResponse;
}
Indexing bulk of documents
When handling a large volume of documents, opting for bulk operations is more efficient than making individual calls. ElasticSearch offers an API for bulk document indexing, allowing us to use a single call to IndexMany with the list of documents for indexing.
The following example shows how we can do this with an IEnumerable of flights:
public async Task<bool> BulkIndexDocumentsAsync(string indexName, IEnumerable<Flight> flights, CancellationToken cancellationToken)
{
    if (string.IsNullOrWhiteSpace(indexName))
    {
        throw new ArgumentNullException(nameof(indexName));
    }
    if (flights == null)
    {
        throw new ArgumentNullException("Indexing null document is not allowed");
    }

    var response = await _client.BulkAsync(b => b.IndexMany(flights, (idx, doc) => idx.Index(indexName)), cancellationToken);

    return response.IsValidResponse;
}
Updating documents
When updating documents in ElasticSearch, there are multiple approaches available. We can either update a single document directly or apply a partial update to a group of documents that meet specific criteria defined in the request query.
Update a document by Id
We can update a single document with the UpdateAsync API by providing the document ID:
if (string.IsNullOrWhiteSpace(indexName))
{
    throw new ArgumentNullException(nameof(indexName));
}
if (flight == null)
{
    throw new ArgumentNullException("Indexing null document is not allowed");
}

var updateResponse = await _client.UpdateAsync<Flight, Flight>(indexName, Id, u => u.Doc(flight));

return updateResponse.IsValidResponse;
Update documents that match a query
In case we need to update one or more documents that match a certain condition, we need to provide the query and a script to tell ElasticSearch what to do with the matches. For example, assuming we want to cancel all flights going to a given airport, we can do so like this :
if (string.IsNullOrWhiteSpace(indexName))
{
    throw new ArgumentNullException(nameof(indexName));
}
if (string.IsNullOrWhiteSpace(destination))
{
    throw new ArgumentNullException(nameof(destination));
}

var inlineScript = new InlineScript()
{
    Source = $"ctx._source.{nameof(FlightBreif.Cancelled)} = params.cancelled",
    Params = new Dictionary<string, object>()
    {
        { "cancelled", isCancelled }
    }
};

var script = new Script(inlineScript);
var updateResponse = await _client.UpdateByQueryAsync<FlightBreif>(indexName, d => d
                                                        .Query(q => q
                                                        .Match(m => m
                                                            .Field(f => f.Destination)
                                                            .Query(destination)))
                                                        .Script(script));
For simplicity, we chose an inline script rather than a stored script (similar to running SQL commands inline or as Stored Procedures).
After creating an inline script and specifying the necessary parameters for our update operation, such as the Cancelled boolean field, conveyed as Key-Value pairs within a dictionary object assigned to the Params property of the inline script, we used the UpdateByQueryAsync API.
This allowed us to update all documents matching our specified criteria, such as the destination of the flight, by providing Elasticsearch with the inline script for executing the updates on the identified flights.
For more information about scripting ElasticSearch, please refer to the online documentation, as this topic is out of the scope of this blog post.
Adding new fields using UpdateByQuery
Using the same API that we used to update one or more documents, we can add new fields to existing documents. To do so, we just need to include the field we need to add in the script section with the initial value, like this :
var Reason = "Bad weather conditions"l
var inlineScript = new InlineScript()
{
    Source = $"ctx._source.delay_reason = params.reason",
    Params = new Dictionary<string, object>()
    {
        { "reason", Reason }
    }
};

var script = new Script(inlineScript);
var updateResponse = await _client.UpdateByQueryAsync<FlightBreif>(indexName, d => d
                                                        .Query(q => q
                                                        .Match(m => m
                                                            .Field(f => f.Destination)
                                                            .Query(destination)))
                                                        .Script(script));
Retrieving document by Id
In use cases where we need to retrieve a document by ID, we can use the GetAsync API, provided with the ID of the document we need to get. The ID is automatically assigned to every document we index by ElasticSearch.
var response = await _client.GetAsync<Flight>(documentId, index => index.Index(indexName), cancellationToken);
Full-Text Search in .NET Core
In the next part of our blog post, we’re exploring the full-text search capabilities of ElasticSearch. ElasticSearch provides powerful tools for searching and analyzing data, offering a comprehensive set of features for different search scenarios. While ElasticSearch offers a wide range of search functionalities, in this section, our focus will be on the more common use cases for searching and aggregations. We’ll discuss practical applications and highlight essential features for effective information retrieval. Although we won’t cover all of ElasticSearch’s search capabilities, our aim is to provide a concise overview of key components and functionalities.
Basic text queries for search functionality
Match
For a standard and basic full-text query, the simplest way to search for a document is by providing the field we want to search and the matching value:
var response = await _client.SearchAsync<Flight>(s => s
  .Index(indexIndex)
  .Query(q => q
    .Match(mq => mq
      .Field(f => f.DestCountry)
      .Query(value))));
Refining Results
To refine the matching process, we can adjust the fuzziness and MinimumShouldMatch parameters, by adding them to the match query:
response = await _client.SearchAsync<Flight>(
    s =>
    s.Index(indexIndex)
    .Query(
        q =>
        q.Match(
            mq =>
            mq.Field(field => field.DestCountry)
            .Query(value)
            .MinimumShouldMatch(new MinimumShouldMatch(2))
            .Fuzziness(new Fuzziness(1))
        )
    )
);
Fuzziness: This parameter specifies the edit distance from the value in the document. For instance, ‘UK’ and ‘US’ are 1 edit distance apart.
MinimumShouldMatch: Setting this parameter to 2, for example, ensures that the query checks for documents containing a minimum of 2 matching words.
Matching with Boolean Operations Between Multiple Queries:
We can combine multiple match queries using a boolean operator. This operator must precede the queries. Conceptually, we can think of this operator as operating at a higher hierarchical level, similar to a parent, with multiple ‘child’ queries. For example, if we want to find all flights headed to a specific country with a particular flight number, we can use the following syntax:
var expandedSearch = await _client.SearchAsync<FlightBreif>(s => s
    .Index(index)
    .Query(q => q
        .Bool(boolean => boolean
            .Must(
                (query) => {
                    query.Match(mq => mq
                        .Field(field => field.Destination)
                        .Query(dest));
                },
                (query) => {
                    query.Match(mq => mq
                        .Field(field => field.FlightNum)
                        .Query(flight));
                }))));
Multi-Match
We just saw how to search for a phrase and combine queries. However, what if we need to search multiple fields in a document to match a value? This is where MultiMatch comes into play.
This type of query builds upon the basic match, allowing us to run queries on multiple fields simultaneously. In C#, it looks like this:
var response = await _client.SearchAsync<Flight>(s => s
                                          .Index(indexIndex)
                                          .Size(10)
                                          .Query(q => q
                                          .MultiMatch(mm => mm
                                            .Query(query)
                                            .Fields("DestCountry, OriginCountry"))));
Here, we built a query that will attempt to match whatever value we provide the “query” against “DestCountry” and “OriginCountry” fields.
Match Phrase
the match_phrase query is used to perform a phrase search. It matches documents containing an exact sequence of words as specified in the query. Unlike the match query, which breaks the text into individual terms, match_phrase treats the entire input as a single term.
var response = await _client.SearchAsync<FlightBreif>(s => s
                                    .Index(index)
                                    .Query(q => q
                                        .MatchPhrase(mp => mp
                                            .Field(f => f.Comments)
                                            .Query(phrase)
                                            )));
Term Query / Terms Query
In Elasticsearch, the Term Query and Terms Query are term-level queries designed to find documents based on precise values in structured data, such as dates, IP addresses, prices, or product IDs. Unlike full-text queries, term-level queries do not analyze search terms. Instead, they try to an exact match of the search keyword against the values stored in a field.
Term Query: The Term Query is the simplest term-level query. It searches for an exact match of the search keyword against the values stored in a specific field within documents.
Terms Query: The Terms Query is an extension of the Term Query, allowing you to search for multiple exact matches within a field. You can provide a list of values, and the query will match documents where the specified field contains any of those exact values.
For example, searching for a flight with a specific flight delay time, where the delay time field is structured, can be done like this:
var response = await _client.SearchAsync<Flight>(s => s
                                    .Index(index)
                                    .Query(query => query
                                        .Term(t => t
                                            .Field(f => f.FlightTimeMin)
                                            .Value(Equals(FlightTimeMin))))
                                        );
Range
In Elasticsearch, the Range Query is used to retrieve documents that contain terms within a specified range. This query is particularly useful for searching and filtering structured data, and it can be applied to fields containing numerical values, date values, and more.
For example, suppose we need to find all the flight that their flight time is greater than FlightTimeMin, we can do so like this :
var response = await _client.SearchAsync<Flight>(s => s
    .Index(index)
    .Query(q => q
        .Range(r => r
            .Field(f => f.FlightTimeMin)
            .GreaterThan(FlightTimeMin))));
Wildcard Query
Wildcard Queries are used to retrieve documents containing terms that match a specified wildcard pattern. Wildcard operators act as placeholders, matching one or more characters within a term. The asterisk (*) is a commonly used wildcard operator that matches zero or more characters, and it can be combined with other characters to form a wildcard pattern.
var response = await _client.SearchAsync<Flight>(s => s
                                    .Index(index)
                                    .Query(query => query
                                        .Wildcard(wc => wc
                                            .Field(f => f.DestCountry)
                                            .Value(wildcardQuery))));
Aggregations
Aggregation queries in Elasticsearch are powerful mechanisms for analyzing and summarizing data, going beyond simple document retrieval. Unlike traditional searches that return individual documents, aggregations enable us to extract meaningful insights by grouping, filtering, and performing calculations on your data.
ElasticSearch provides three types of aggregations:
- Metric: To perform calculations on numeric fields within documents, including metrics like sum, average, min, and max
- Bucket: To group documents into buckets, based on field values, ranges, or other criteria.
- Pipeline: aggregations that take input from other aggregations instead of documents or fields.
We will discuss the first two types of aggregations in this post.
Let’s take a quick look at the fundamental syntax for crafting aggregations in Elasticsearch. The aggregation definition typically kicks off with the aggs keyword, followed by a user-defined aggregation name, the type of aggregation, and the specific field under consideration. Here’s a simplified representation:
"aggs": {
    "aggregation_name": {
        "aggregation_type": {
            "field": "document_field_name"
        }
    }
}
aggs: This keyword signals the use of an aggregation.aggregation_name: The name you give to your aggregation.aggregation_type: Specifies the type of aggregation in use.field: Identifies the exact field targeted by the aggregation.document_field_name: Denotes the column name of the specific document.
We will explore Metric Aggregations in Elasticsearch using the fluent syntax in C#.
Keeping the basic aggregation structure we saw above, let’s start by creating a basic aggregation. We will use the sample flight data provided by Elasticsearch.
Bucket Aggregation Example – Flights by Country:
Assume we need to get the total number of flights for each destination airport. The query syntax of this aggregation will look like this:
GET /kibana_sample_data_flights/_search
{
  "size": 0,
  "aggs": {
    "FlightsByDestination": {
      "terms": {
        "field": "DestCountry"
      }
    }
  }
}
The corresponding C# code using Fluent syntax would be like this:
var aggregationName = "by_country";
var indexName = "kibana_sample_data_flights";
Dictionary<string, long>? aggregationResult = new Dictionary<string, long>();

var response = await _client.SearchAsync<Flight>(s => s
    .Index(indexName)
    .Aggregations(agg => agg
        .Terms(aggregationName, t => t.Field(f => f.DestCountry))));

if (response.IsValid)
{
    var aggregatedResultBuckets = response.Aggregations?
        .GetStringTerms(aggregationName)?
        .Buckets;

    if (aggregatedResultBuckets != null)
    {
        aggregationResult = aggregatedResultBuckets
            .ToDictionary(k => k.Key.Value?.ToString()!, v => v.DocCount);
    }
}

return aggregationResult;
Here, we are creating an aggregate called “by_country” and setting the aggregation field as DestCountry. Then, if the aggregation request was successful, Elasticsearch will provide the aggregation result in buckets. Each bucket corresponds to a grouping value. To extract the result, we use GetStringTerms to access the by_country aggregation results, then we use .Buckets to get the IReadOnlyCollection of buckets.
Nested Aggregation example for more advanced use cases
We can combine and nest aggregations to create more advanced queries and obtain detailed results. Let’s explore a few examples to highlight the flexibility and power that this feature provides.
Example 1 – Get the total flights per day, per country
Imagine a scenario where we want to analyze the total number of flights for each day, further segmented by the countries to which these flights are destined. This helps us understand the flight patterns daily, providing a more granular view of the data.
DSL Syntax for Aggregations:
"aggs": {
  "FlightsByDay": {
    "terms": {
      "field": "dayOfWeek"
    },
    "aggs": {
      "PerDestination": {
        "terms": {
          "field": "DestCountry"
        }
      }
    }
  }
}
In this DSL (Domain Specific Language) syntax:
- We create an aggregation named “
FlightsByDay” using the “terms” aggregation on the “dayOfWeek” field. - Nested within “
FlightsByDay,” we have another aggregation named “PerDestination,” utilizing the “terms” aggregation on the “DestCountry” field.
Corresponding C# Code:
var byCountry = "by_country";
var byDay = "by_day";
var indexName = "kibana_sample_data_flights";
Dictionary<string, long>? aggregationResult = new Dictionary<string, long>();
var ByDayByCountryAggregation = new Dictionary<string, Dictionary<string, long>>();

var response = await _client.SearchAsync<Flight>(s => s
               .Index(indexName)
                    .Aggregations(agg => agg
                        .Terms (byDay, t => t
                            .Field(f => f.dayOfWeek)
                        .Aggregations(agg => agg
                            .Terms(byCountry, t => t
                                .Field(f => f.DestCountry))))));

if (response.IsSuccess())
{
    // Get the daily aggregation (list of buckets where each bucket is a day)
    var dailyAggreationBuckets = response.Aggregations?.GetLongTerms(byDay);
    if (dailyAggreationBuckets != null)
    {
        // Iterate over the daily aggregation buckets so we can get the country aggregation for each day
        foreach (var dayBucket in dailyAggreationBuckets.Buckets)
        {
            // Create a new dictionary for the current day that will hold the aggregation by country
            var dailyAggreationByCountry = new Dictionary<string, long>();

            // Get the country aggregation for the current day (list of countries and their counts)
            var countryAggregationBuckets = dayBucket
                .GetStringTerms(byCountry)?
                .Buckets;

            // If there are countries in the aggregation, add them to the dictionary
            if (countryAggregationBuckets != null)
            {
                foreach (var countryBucket in countryAggregationBuckets)
                {
                    var country = countryBucket.Key.Value?.ToString()!;
                    var count = countryBucket.DocCount;
                    dailyAggreationByCountry.Add(country, count);
                }

                // Add the daily aggregation to the dictionary
                ByDayByCountryAggregation.Add(dayBucket.Key.ToString(), dailyAggreationByCountry);
            }
        }
    }

}
Example 2 – Identify top 3 most delayed airline carriers:
In this example, let’s assume we want to collect information about the top 3 airlines experiencing the most delays. We can do this by using basic data calculations, like finding the average, on specific fields. We’ll direct ElasticSearch to compute this average for us, using the values in the FlightDelayMin field.
The DSL query would like this:
{
  "size": 0,
  "aggs": {
    "airline_delay": {
      "terms": {
        "field": "Carrier",
        "size": 3,
        "order": {
          "avg_delay": "desc"
        }
      },
      "aggs": {
        "avg_delay": {
          "avg": {
            "field": "FlightDelayMin"
          }
        }
      }
    }
  }
Corresponding C# Code:
var aggregattionName = "airline_delay";
var averageDelayAggregation = "avg_delay";
var indexName = "kibana_sample_data_flights";
Dictionary<string, double>? aggregationResult = new Dictionary<string, double>();

var order = new List<KeyValuePair<Field, SortOrder>>
{
    new(averageDelayAggregation, SortOrder.Desc)
};

var response = await _client.SearchAsync<Flight>(s => s
       .Index(indexName)
       .Aggregations(agg => agg
          .Terms(aggregattionName, t => t
             .Field(f => f.Carrier)
             .Size(3)
             .Order(order)
          .Aggregations(innerAgg => innerAgg
             .Avg(averageDelayAggregation, avg => avg
                .Field(f => f.FlightDelayMin))))));

if (response.IsSuccess())
{
    var aggregatedResultBuckets = response.Aggregations?
        .GetStringTerms(aggregattionName)?
        .Buckets;

    if (aggregatedResultBuckets != null)
    {
        foreach (var bucket in aggregatedResultBuckets)
        {
            var carrierName = bucket.Key.Value?.ToString()!;
            var averageDelayInMinutes = bucket.GetAverage(averageDelayAggregation)?.Value ; // .Avg("average_ticket_price")?.Value;


            aggregationResult.Add(carrierName, averageDelayInMinutes ?? 0);
        }
    }
}
Notice in the C# snipped where we added an aggregation inside another aggregation. then, to extract the result, we need to use the GetAverage() method on the bucket, which in return provides an aggregation object value.
Example 3 – Top 5 airlines based on total number of flights
In this scenario, let’s imagine we want to build an aggregation focused on the total number of flights. Furthermore, for each airline, we intend to gather aggregated details like the total number of flights, average ticket price, and overall distance traveled.
The DSL should look like this:
"aggs": {
    "top_airlines": {
      "terms": {
        "field": "Carrier",
        "size": 5,  // Set the size based on the number of top airlines you want to retrieve
        "order": {
          "total_flights": "desc"
        }
      },
      "aggs": {
        "total_flights": {
          "value_count": {
            "field": "FlightNum"
          }
        },
        "average_ticket_price": {
          "avg": {
            "field": "AvgTicketPrice"
          }
        },
        "total_distance": {
          "sum": {
            "field": "DistanceKilometers"
          }
        }
      }
    }
  }
And the C# code for this would be as follows:
var aggregattionName = "top_airlines";
var totalFlightsAggregation = "total_flights";
var averageTicketPriceAggregation = "average_ticket_price";
var totalDistanceAggregation = "total_distance";

Dictionary<string, Dictionary<string, string>> result = new Dictionary<string, Dictionary<string, string>>();

var indexName = "kibana_sample_data_flights";

var order = new List<KeyValuePair<Field, SortOrder>>
{
    new(totalFlightsAggregation, SortOrder.Desc)
};

var response = await _client.SearchAsync<Flight>(s => s
                  .Index(indexName)
                  .Aggregations(agg => agg
                    .Terms(aggregattionName, t => t
                        .Field(f => f.Carrier)
                        .Size(5)
                        .Order(order)
                        .Aggregations(innerAgg => innerAgg
                            .ValueCount(totalFlightsAggregation, vc => vc
                            .Field(f => f.FlightNum))
                            .Avg(averageTicketPriceAggregation, avg => avg
                                .Field(f => f.AvgTicketPrice))
                            .Sum(totalDistanceAggregation, sum => sum
                            .Field(f => f.DistanceKilometers))))));

if (response.IsSuccess())
{
    var airlinesAggregationBuckets = response.Aggregations?
        .GetStringTerms(aggregattionName)?
        .Buckets;

    if (airlinesAggregationBuckets != null)
    {
        foreach (var bucket in airlinesAggregationBuckets)
        {
            var carrierName = bucket.Key.Value?.ToString()!;
            var totalFlights = bucket.GetValueCount(totalFlightsAggregation)?.Value;
            var averageTicketPrice = bucket.GetAverage(averageTicketPriceAggregation)?.Value;
            var totalDistance = bucket.GetSum(totalDistanceAggregation)?.Value;

            var airline = new Dictionary<string, string>
            {
                { "total_flights", totalFlights.ToString() },
                { "average_ticket_price", averageTicketPrice.ToString() },
                { "total_distance", totalDistance.ToString() }
            };

            result.Add(carrierName, airline);
        }
    }
}
Wrap up
ElasticSearch is a standout tool, especially when it comes to text analysis and search functionalities. Its feature-rich API provides developers with a host of capabilities, offering powerful tools to enhance text-related operations.
I trust you found this blog post useful for kicking off your ElasticSearch journey. There are plenty of online resources for delving into advanced scenarios and tricks. Feel free to explore them as you continue your ElasticSearch exploration.
Happy coding, and may you thoroughly enjoy immersing yourself in the world of text analysis with ElasticSearch!
Cover Photo from Pexels by Tobias Aeppli