
Redis (which stands for Remote Dictionary Server, is a very fast, open-source, in-memory data structure store, specifically a key-value store, used as a cache, database, message broker and streaming engine.
One of the standout features of Redis is its exceptional speed. It’s designed to work in-memory, which means lightning-fast data access and retrieval, making it ideal for scenarios where low-latency responses are critical. This versatility allows developers to choose the suitable data structure for their specific use case and scenario, whether it is store simple key-value pairs, managing complex data relationships or handing real-time streaming data.
In this post, our primary focus will be exploring the integration of Redis within .NetCore applications. We’ll dive into several essential and common use cases for Redis, including caching, real-time analytics and counters, as well as implementing pub/sub messaging for event driven architectures.
While Redis is a also capable of implementing distributed locks, we will not delve into this specific topic within this post.
- Why does caching matter in web applications?
- How does Redis improve application performance through caching?
- Getting Started
- Implementing Redis integration
- Handling cache expiration and eviction policies
- Working with Hashes
- Distributed Caching and Redis
- Conclusion
- Online documentation and references
Application performance and resource utilization are always considered important aspects of software development for nearly any product. Applications should be fast, responsive, and make efficient use of the resources assigned to them.
Caching plays an important role in achieving there performance goals, and it’s a fundamental concept in web application development. By storing frequently accessed data in a cache, the applications can dramatically reduce the response time and resource used to retrieve the data from the underlying storage or database systems. This can lead to quicker response times, lower server and an overall improved user experience.
Redis significantly improves performance through caching by offering several key advantages:
Getting Started
Redis is a versatile tool that can be employed in various hosting environments, whether it’s on your local computer, on-premises datacenter, or in the cloud. In this post, we won’t get into on where Redis is hosted, but rather focus on the setup and connection aspects from source code perspective. To keep things simple, we’ll use a Redis Docker image on your computer.
Setting up a Redis instance (from a Docker Redis instance) Ensure your Docker service is running, then run the following command:
docker pull redisImplementing Redis integration
In order to showcase the integration of Redis with a .NET Core 6 application, we’ll be working with a web API-based project. To maintain simplicity and direct our focus toward Redis integration, we’ll keep the project structure straightforward.
The project we will be using is split into basic fundamental components including an API layer, a repository, domain logic, and dedicated test projects.
Installing the Redis client library for .NET Core.
To use Redis in a .NetCore application, we need to install StackExchange.Redis to our project.
Creating Redis DB Provider
For implementing Redis functionality within our application, we’ll make use of .NET Core’s Dependency Injection (DI) capabilities.
Let’s begin by creating the IRedisDbProvider interface:
public interface IRedisDbProvider : IDisposable
{
    public IDatabase database { get; }
}
Now, we’ll create a class to implement this interface:
public class RedisDbProvider : IRedisDbProvider
{
    private readonly Lazy<ConnectionMultiplexer> _lazyConnection;
    private bool disposed = false;
    private readonly string _connectionString;

    public RedisDbProvider(string connectionString)
    {
        _connectionString = connectionString ?? throw new ArgumentNullException(connectionString);
        _lazyConnection = new Lazy<ConnectionMultiplexer>(() => ConnectionMultiplexer.Connect(_connectionString));
    }

    public IDatabase database => _lazyConnection.Value.GetDatabase();

    public void Dispose()
    {
        Dispose(true);
        GC.SuppressFinalize(this);
    }

    protected virtual void Dispose(bool disposing)
    {
        if (disposed)
            return;

        if (disposing)
        {
            if (_lazyConnection.IsValueCreated)
            {
                _lazyConnection.Value.Dispose();
            }
        }

        disposed = true;
    }
}
Now, let’s take a moment to understand the implementation we’ve just completed:
ConnectionMultiplexer: This is a critical component provided by the Redis NuGet library. It serves as a multiplexing layer responsible for managing multiple connections to one or more Redis servers.
Here’s a brief overview of what ConnectionMultiplexer provides:
- Connection Management: Redis is designed to efficiently handle multiple client connections. The
ConnectionMultiplexermanages these connections on behalf of your application, abstracting away the complexity of managing individual connections manually. - Thread-Safe: It is designed to be thread-safe, allowing multiple threads within your application to share and use the same
ConnectionMultiplexerinstance concurrently without issues. This makes it suitable for multi-threaded and multi-user scenarios. - Resource Efficiency: Creating and managing a new connection to Redis for every operation can be resource-intensive and slow.
ConnectionMultiplexermaintains a pool of connections and automatically reuses them, reducing the overhead of connection establishment and teardown. - Connection Failover: Redis servers can fail or become unreachable.
ConnectionMultiplexerincludes logic for handling connection failures and automatically reconnecting to available Redis servers, ensuring that your application remains resilient even in the face of Redis server issues. - Configuration: You configure the
ConnectionMultiplexerwith connection details such as server endpoints and connection settings. Once configured, it establishes the necessary connections to the Redis servers and manages them transparently.
Creating the Redis Cache Handler Class
With the IRedisDbProvider in place, we can now proceed to implement the cache handler. This is where we’ll communicate with Redis through its API to perform operations like setting or retrieving data from the cache.
This class serves as a bridge between your application and Redis, allowing us to perform a variety of cache-related operations seamlessly. It’s a critical component for integrating Redis caching into our .NET Core application effectively.
Let’s start by defining the ICacheHandler interface:
public interface ICacheHandler : IDisposable
{
    Task<bool> StringSetAsync(string key, string value, TimeSpan? expiry = null);
    Task<string?> StringGetAsync(string key);
    Task StringDeleteAsync(string key);
    Task<bool> StringExistsAsync(string key);
}
Now, let’s provide its implementation:
public class RedisCacheHandler: ICacheHandler {
  private readonly IRedisDbProvider _redisDbProvider;

  public RedisCacheHandler(IRedisDbProvider redisDbProvider) {
    _redisDbProvider = redisDbProvider ? ?
    throw new ArgumentNullException(nameof(redisDbProvider));

    if (_redisDbProvider.Database == null) {
      throw new ArgumentNullException("The provided redisDbProvider or its database is null");
    }
  }

  private bool disposedValue;

  public Task StringDeleteAsync(string key) {
    var _ = _redisDbProvider.database.StringGetDeleteAsync(key).ConfigureAwait(false);
    return Task.CompletedTask;
  }

  public async Task < bool > StringExistsAsync(string key) {
    return await _redisDbProvider.database.KeyExistsAsync(key).ConfigureAwait(false);
  }

  public async Task < string ? >StringGetAsync(string key) {
    return await _redisDbProvider.database.StringGetAsync(key).ConfigureAwait(false);
  }

  public async Task < bool > StringSetAsync(string key, string value, TimeSpan ? expiry = null) {
    return await _redisDbProvider.database.StringSetAsync(key, value, expiry).ConfigureAwait(false);
  }

  protected virtual void Dispose(bool disposing) {
    if (!disposedValue) {
      if (disposing) {
        _redisDbProvider.Dispose();
      }

      disposedValue = true;
    }
  }

  public void Dispose() {
    Dispose(disposing: true);
    GC.SuppressFinalize(this);
  }

  ~RedisCacheHandler() {
    Dispose(disposing: false);
  }
}
Using Dependency Injection (DI) in Services
To make use of the RedisDbProvider and RedisCacheHandler, it’s essential to set up proper dependency injection (DI) in your application. To achieve this, configure DI in a manner similar to the following example in your program.cs file:
builder.Services.AddSingleton<IRedisDbProvider>(provider =>
{
    var redisConnectionString = builder.Configuration.GetConnectionString("Redis");
    return new RedisDbProvider(redisConnectionString);
});
builder.Services.AddSingleton<ICacheHandler, RedisCacheHandler>();
builder.Services.AddScoped<IProductService, ProductService>();
In this configuration, we do the following:
- We register
IRedisDbProvideras a singleton, ensuring that a single instance ofRedisDbProvideris shared across your application. - Next, we register
ICacheHandleras a singleton, allowing the sameRedisCacheHandlerinstance to be utilized throughout your application. - Lastly, we register any other services you might have, such as
IProductService, using the appropriate scope. This scope depends on the desired lifecycle of the service within your application.
Integrating Redis Cache with the service layer
With our setup in place, it’s time to integrate the RedisCacheHandler with the component in charge of communicating to repository layer (in our example, it is the ProductService ) allowing us to leverage the benefits of caching.
Here’s how the integration works:
- Whenever a new entity is inserted into the system, we take the opportunity to update the cache. This ensures that the most up-to-date data is available for future requests.
- When there’s a request to retrieve data, we follow a two-step process. First, we check if the requested data is already present in the cache. If it is, we retrieve it directly from there. If not, we fetch the data from the database and then update the cache with this newly fetched data. This way, subsequent calls for the same data can be efficiently served from the cache, reducing the load on the database and improving response times.
Here’s how the implement looks:
public class ProductService: IProductService
{
    private readonly ProductsRepository _productsRepository;
    private readonly ICacheHandler _cacheHandler;

    public ProductService(ProductsRepository productsRepository, ICacheHandler cacheHandler)
    {
        _productsRepository = productsRepository ?? throw new ArgumentNullException(nameof(productsRepository));
        _cacheHandler = cacheHandler ?? throw new ArgumentNullException("Cache handler instance is null");
    }

    public async Task<Product> AddProductAsync(Product product)
    {
        if (product is null)
            throw new ArgumentNullException(nameof(product));

        await _productsRepository.AddAsync(product);
        await _productsRepository.SaveChangesAsync();

        // update cache
        await _cacheHandler.StringSetAsync(product.Id.ToString(), JsonSerializer.Serialize(product));

        return product;
    }

    public async Task DeleteProductAsync(int id)
    {
        if (id == default)
            throw new ArgumentException("Id cannot be default value", nameof(id));

        var product = await _productsRepository.Products
            .FirstOrDefaultAsync(p => p.Id == id)
            .ConfigureAwait(false);
        if (product != null)
        {
            _productsRepository.Remove(product);
            _productsRepository.SaveChanges();
        }

        // After deleting from database, delete from cache
        await _cacheHandler.StringDeleteAsync(id.ToString());
    }

    public async Task<Product?> GetProductAsync(int id)
    {
        if (id == default || id < 1)
            throw new ArgumentException("Id cannot be default value", nameof(id));

        // Before getting from database, check if it is in cache
        var productFromCache = await _cacheHandler.StringGetAsync(id.ToString());
        if (productFromCache != null)
        {
            return JsonSerializer.Deserialize<Product>(productFromCache);
        }

        // else, get from database and update cache
        var product = await _productsRepository.Products
            .FirstOrDefaultAsync(p => p.Id == id)
            .ConfigureAwait(false);

        if (product != null)
        {
            await _cacheHandler.StringSetAsync(product.Id.ToString(), JsonSerializer.Serialize(product));
        }

        return product;
    }

    public async Task<IEnumerable<Product>> GetProductsAsync()
    {
        return await _productsRepository.Products.ToListAsync().ConfigureAwait(false);
    }
}
Handling cache expiration and eviction policies
Cache expiration and eviction policies are essential aspects of effective caching. They ensure that cached data remains relevant, doesn’t consume excessive memory, and is updated as needed.
Cache Expiration: This involves setting a time limit on how long an item remains in the cache before it’s considered stale and automatically removed. It helps keep the cache fresh with recent data.
Cache Eviction: Eviction policies determine which items are removed from the cache when it reaches a certain capacity to make room for new data. There are various eviction policies, including LRU (Least Recently Used), LFU (Least Frequently Used), and more.
// Key for the cached item
string cacheKey = "your_cache_key";
string cachedValue = "your_cached_value";

// Set cache expiration to 1 hour
var expiration = TimeSpan.FromHours(1);

// Set the cached item with expiration
_redisDbProvider.Database.StringSet(cacheKey, cachedValue, expiration);
In this example, we set an expiration time of 1 hour for a cached item using TimeSpan.FromHours(1). When the hour elapses, Redis will automatically remove this item from the cache.
Working with Hashes
Redis Hashes, often referred to as Hash data structures, are used to represent a collection of field-value pairs within a single Redis key. Each field is associated with a value, making Redis Hashes a versatile choice for organizing and managing structured data.
For instance, consider a common scenario where we want to represent a user with associated properties. In Redis Hashes, the key represents the user, and the Hash is essentially a collection of hash entries. Each hash entry consists of a property and its corresponding value, providing an organized and efficient way to store and manage structured data.
The Hash of a user might look something like this:
Key: 'user:JohnDoe'
	Field: 'username'
		Value: 'johnd'
	Field: 'email'
		value: 'somemail@server.com'
In our example, let’s enhance our ICacheHandler and RedisCacheHandler implementation to support Redis Hashes.
We’ll add the following methods to the ICacheHandler interface:
// Hashes
Task HashSetAsync(string key, string hashField, string value);
Task HashSetAsync(string key, IEnumerable<KeyValuePair<string, string?>> values);
Task<string?> HashGetAsync(string key, string hashField);
And their implementation in RedisCacheHandler:
/// <summary>
/// Creates a hashset with the given key, then add a single entry to it
/// </summary>
/// <param name="key"></param>
/// <param name="hashField"></param>
/// <param name="value"></param>
/// <returns></returns>
public async Task HashSetAsync(string key, string hashField, string value)
{
    await _redisDbProvider.database.HashSetAsync(key, hashField, value).ConfigureAwait(false);
}

/// <summary>
/// Creates a hashset with the given key, then add multiple entries to it
/// </summary>
/// <param name="key"></param>
/// <param name="values"></param>
/// <returns></returns>
public async Task HashSetAsync(string key, IEnumerable<KeyValuePair<string, string?>> values)
{
    // convert the values to HashEntry[] array
    var hashEntries = values.Select(v => new HashEntry(v.Key, v.Value)).ToArray();
    await _redisDbProvider.database.HashSetAsync(key, hashEntries).ConfigureAwait(false);
}

/// <summary>
/// Attempts to get a value from a hashset with the given key and hashField
/// </summary>
/// <param name="key"></param>
/// <param name="hashField"></param>
/// <returns>The requested hash, null of none was found mathcing the provided key</returns>
public async Task<string?> HashGetAsync(string key, string hashField)
{
    return await _redisDbProvider.database.HashGetAsync(key, hashField).ConfigureAwait(false);
}
By integrating Redis Hashes into our ICacheHandler and RedisCacheHandler implementations, we’ve enhanced our ability to manage structured data in Redis. It allows us to efficiently handle key-value data organized as collections of field-value pairs.
Distributed Caching and Redis
Up until now, we’ve delved into the significance of caching and its pivotal role in enhancing application performance. We’ve explored how Redis can be harnessed to create blazing-fast applications, ultimately improving the user experience.
However, our exploration has centered on local caching, a valuable technique that significantly improves response times and optimizes resource utilization. But, what happens when our applications expand beyond a single server or when we require data consistency and availability across multiple instances? This is precisely where distributed caching comes into play.
What Is Distributed Caching?
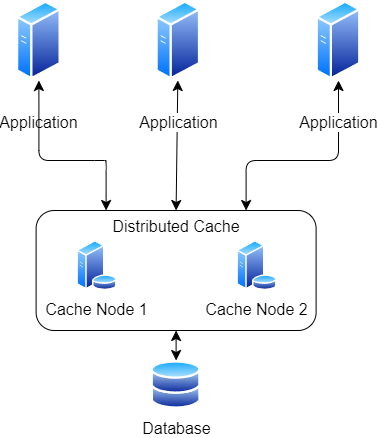
Distributed caching is a strategic approach to caching that extends the benefits of caching to distributed and multi-server environments. It involves the storage of frequently accessed data in a shared cache, accessible by multiple application instances, servers, or even across geographically dispersed regions.
Here’s a breakdown of what distributed caching entails:
- Caching: At its core, caching involves storing data temporarily in a high-speed, easily accessible storage location (the cache) to accelerate data retrieval. This helps reduce the load on slower data sources, such as databases, and improves application responsiveness.
- Distribution: In distributed caching, the cache is distributed across multiple servers or nodes within a network. Each server maintains a portion of the cache, and these caches are synchronized to ensure data consistency and availability across the entire network.
- Data Sharing: Distributed caches enable multiple application instances or servers to share and access cached data. When one server retrieves data from the cache, it becomes available to other servers in the network. This shared data pool helps optimize resource utilization and reduces redundant data retrieval.
Overall, distributed caching is a powerful tool for optimizing the performance and scalability of applications, particularly in distributed and cloud-based environments. It helps deliver a smoother user experience, reduces latency, and minimizes the load on backend data sources, resulting in more responsive and efficient applications.
Distributed Caching with Redis
When it comes to implementing distributed caching, we’ll find that it’s a straightforward process that can be accomplished with just a few lines of code. To begin, we need to take the following steps:
- Let’s start by adding the Microsoft.Extensions.Caching.StackExchangeRedis package to our project.
- Now, we can configure Redis distributed caching by using the AddStackExchangeRedisCache extension method. Here’s how we can do it:
builder.Services.AddStackExchangeRedisCache(options =>
{
    // Configure Redis distributed cache
    options.InstanceName = "redis";
    options.Configuration = builder.Configuration.GetConnectionString("redisConnectionString");
});
By implementing this code, we effectively establish Redis distributed caching within our application.
The AddStackExchangeRedisCache method not only adds RedisCacheImpl as the implementing class for IDistributedCache but also registers it as a singleton instance. This means that we now have a powerful caching solution at our disposal, ready to enhance the performance and responsiveness of our .NET Core application.
To use distributed caching, just inject the IDistributedCache interface into any consumer’s constructor, and you’re all set!
Please Note: With the integration of the IDistributedCache interface into our application’s services, it’s crucial to be aware of API changes compared to our previous use of the ICacheHandler interface.
For instance, when setting a new key, the procedure now appears as follows:
public async Task<bool> StringSetAsync(string key, string value, TimeSpan? expiry = null)
    {
        var options = new DistributedCacheEntryOptions
        {
            AbsoluteExpirationRelativeToNow = expiry
        };

        await _distributedCache.SetStringAsync(key, value, options);
        return true; // StringSetAsync in IDistributedCache always returns true
    }
Caching with Redis in .NET Core – Conclusion
To sum this part up, caching is like a supercharger for your applications, regardless if how it is written in .NetCore or others. It makes them faster and more efficient. By using caching, we can make our applications response quickly, reduce delays, and lighten the load on databases and other services.
This means users get a smoother experience. As we’ve seen, there are tools like Redis that help with caching, and they can make a big difference. Also, understanding when to refresh cached data and when to clear out old stuff helps keep things up-to-date without wasting resources. In the world of software, caching is a secret weapon for creating snappy and user-friendly .NET Core apps that can handle lots of users without breaking a sweat.
Online documentation and references
Additional online resources and reading materials for further exploration.
Distributed caching in ASP.NET Core | Microsoft Learn
https://stackexchange.github.io/StaakExchange.Redis/
Cover Photo by zhang kaiyv