
What is Hangfire?
Hangfire is an open-source, well-documented task-scheduling library for Dotnet-based applications. It has many features and capabilities and offers a variety of job types that you can use based on your need. Hangfire uses persistent database storage to store information about the background jobs, allowing them to survive application restarts, server reboots, and so on…
How Hangfire works?
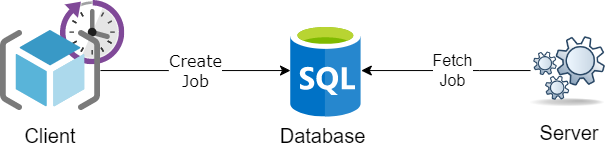
There are three main components in Hangfire architecture: Server, Client, and storage.
- Hangfire Client: The NuGet package (library) that you use to create the background jobs.
- Hangfire Server: The class that processes the background jobs that the Client submits.
- Hangfire Storage: Hangfire database to store information related to the background jobs.
From a high-level point of view, we create new jobs using Hangfire Client. Hangfire client offers a set of methods that we can use to create different kinds of jobs as per our own needs.
Hangfire Server fetches the jobs from the database and starts executing them.
HangFire jobs States
Each background job can have one of the following states:
Enqueued, Scheduled, Awaiting, Processing, Failed, Succeeded and Deleted;
Once a job is created, it will have an initial state, then start moving from one state to another during the background processing.
Setting up Hangfire in .Net core
To show working with Hangfire, we will create a new WebAPI project. The API will create a background job to process once a user sends a request with some sample data.
Create a new web API project:
dotnet new webapi -n hangfireInstall the following Hangfire packages:
Hangfire.Core
Hangfire.AspNetCore
In order for Hangfire to save information about background jobs, it needs a database. As of the time of writing these lines, Hangfire supports Microsoft SQL Server 2008R2 (any edition, including LocalDB) and later, Microsoft SQL Azure. Storing information using in-memory is still in the Beta stage.
You can find more information provided in the official documentation here.
In this post, I will be using SqlExpress as the Hangfire database, so I’ve included the Hangfire.SqlServer package as well.
Setup Hangfire services during application startup:
// Add Hangfire Services
    builder.Services.AddHangfire(globalConfiguration =>
    {
        globalConfiguration.SetDataCompatibilityLevel(CompatibilityLevel.Version_170)
            .UseSimpleAssemblyNameTypeSerializer()
            .UseRecommendedSerializerSettings()
            .UseSqlServerStorage(builder.Configuration.GetConnectionString("HangfireConnection"), new SqlServerStorageOptions
            {
                CommandBatchMaxTimeout = TimeSpan.FromMinutes(5),
                SlidingInvisibilityTimeout = TimeSpan.FromMinutes(5),
                QueuePollInterval = TimeSpan.Zero,
                UseRecommendedIsolationLevel = true,
                DisableGlobalLocks = true
            });
    });

    // Add Hangfire server
    builder.Services.AddHangfireServer();
Enabling Hangfire dashboard
Optional Dashboard: Hangfire provides a nice feature out of the box, which is a UI Dashboard which we can use to monitor the status of the background jobs.
You can enable the Hangfire dashboard simply by adding it to the application pipeline:
app.UseHangfireDashboard();
For more details about the Hangfire dashboard and its configuration, please refer to the official documentation here.
Hangfire Job Types
Hangfire supports different types of jobs that we can create:
- Fire and forget jobs
- Delayed or Scheduled jobs
- Recurring Jobs
- Continuation Jobs
Fire and forget
This type of job gets executed only once after its created. Once the job gets created by Hangfire, it gets a unique ID which Hangfire returns, then immediately queues the jobs for the next execution cycle.
You can see the status and progress of the job either in the Hangfire dashboard or query its status using the Job Id.
[HttpPost("/FireForget")]
    public IActionResult CreateFireAndForget(string rawData)
    {
        var jobId = BackgroundJob.Enqueue(() => _dataProcessor.Process(rawData));

        return Ok($"Submitted new job to process {rawData} : {jobId}");
    }
The call to Enqueue() actually creates a new job definition, and then enqueues it for processing without delay.
To get details about the job, you can use JobStorage.Current.GetMonitoringApi() a method which will return a DTO containing useful information about the background job.
Delayed jobs
Delayed jobs are meant to be executed at some later time in the future after it was created. You can set when the jobs need to be run, and Hangfire will take of the rest.
[HttpPost("/Delayed")]
    public IActionResult CreateDelayedJob(string rawData)
    {
        var jobId = BackgroundJob.Schedule( () => _dataProcessor.Process(rawData), TimeSpan.FromSeconds(10));

        return Ok($"Submitted new delayed job to process {rawData} : {jobId}");
    }
In the above code snippet, we created a new background with .Schedule() the method, and pass it on two parameters – the code we want to execute later, and the delay.
The Schedule() the method will create the new job definition and save it and will schedule it to be executed at the specified time.
Recurring Jobs
We create recurring jobs when we need them to run time and time again, based on a defined interval.
Examples of this type of job are daily batch processing tasks, weekly database cleanups, daily report generation, and so on and so forth. Creating a recurring job is simple and easy, with only a single line of code:
public IActionResult CreateRecurringJob(string rawData)
    {
        RecurringJob.AddOrUpdate(() => _dataProcessor.Process(rawData), Cron.Minutely());

        return Ok($"Submitted new delayed job to process {rawData}");
    }
In the above code, we use the RecurringJob.AddOrUpdate() method and pass it two parameters – The code we need to execute as a recurring job, and a Cron expression that defines the interval.
For more details about Cron expressions please see here.
Continuation Jobs
Continuation jobs are used when we need to execute a job after a previous one got completed. This Hangfire feature chains together task execution for many jobs. Let’s see how we can create such ‘chained’ jobs:
public IActionResult CreateContinuationJob(string rawData)
    {
        var jobId = BackgroundJob.Enqueue(() => _dataProcessor.Process(rawData));
        var reportJobId = BackgroundJob.ContinueJobWith(jobId, () => _dataProcessor.GenerateReport(rawData));
        var cleanUpJobId = BackgroundJob.ContinueJobWith(reportJobId, () => _dataProcessor.Cleanup());

        return Ok($"Submitted new Continuation job to process {rawData}");
    }
Cancellation Tokens
Hangfire supports graceful shutdown and canceling job processing with CancellationToken. In shutdown scenarios, the job execution is stopped and inserted into the beginning of the processing queue. This allows Hangfire to pick it up for processing after starting again.
To enable the support for canceling tasks, you need to pass the cancellation token to the executing method.
public async Task<IActionResult> CreateWithCancel(string rawData, CancellationToken cancellationToken)
    {
        var jobId = BackgroundJob.Enqueue(() =>  _dataProcessor.LongProcess(rawData, cancellationToken));
        return Ok($"Submitted new job to process with cancellation token support {rawData}");
    }
Notice that we are passing the cancellation token to the executing task.
Hangfire checks for any cancellation needed every 5 seconds and cancells any jobs that received a cancellation request withing the past 5 seconds. You can configure the interval of Hangfire server checks like this:
builder.Services.AddHangfireServer(options =>
{
    options.CancellationCheckInterval = TimeSpan.FromSeconds(1);
});
That’s it for this time,
Thanks for stopping by & Keep Coding!
Cover Image by Gerd Altmann from Pixabay